
How to Draw A Coyote
How to Draw A Coyote. There is a lot of incredible wildlife to see throughout North America. One of the most well-known creatures in these countries is the coyote.
Also, check out our Cat Coloring Pages.
This wolf-like dog is common in many parts of the country and can also be located in regions of South America.
Known for their eerie howls, they feature in many myths and stories across the country.
Many people love these clever creatures, and learning to draw a coyote can be fun.
This drawing tutorial will bring great fun and joy to people who love this animal!
How to Draw A Coyote
Step 1
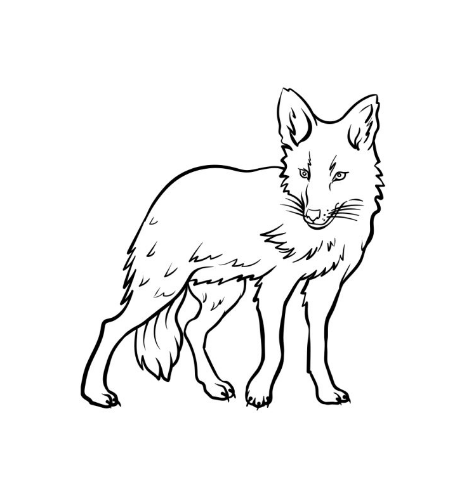
This first step of our guide to drawing a coyote starts with the animal’s head. The coyote has small eyes, and you can start drawing them with small circle shapes.
These shapes also have some straight lines extending from them.
Next, add some jagged line detail around the eyes, then you can draw the nose underneath. Once the nose is drawn, you can use curved lines for the coyote’s face.
Next, use some spiky lines for the sides of the head to give it a furry look. Draw the neck down, so we’ll finish by drawing the ears.
These are big enough, and you can add some curved line details inside.
Step 2
Now that you have the head of this coyote drawing, we can start adding the body and the first few legs.
First, use some smooth, slightly curved lines extending from the base of the neck for the first front leg.
Next, use some sharp, jagged lines at the base of the leg to give the coyote its furry chest. You can use similar jagged lines for the coyote’s belly.
Use a few more curved lines for the coyote’s back, and then you can complete this step by drawing the first hind leg.
Step 3
Continuing this tutorial on how to draw a coyote, let’s now add another front leg to the animal.
This leg will look quite similar to the first in that it will have jagged fur lines near the base and smooth lines for the rest.
This leg is slightly bent at the toe, as shown in the reference image. This is the main difference between this leg and the previous one you drew.
After this phase, we are ready for the fourth step of the guide!
Step 4
We’ll complete the outline of this coyote drawing in this part of your coyote drawing before adding some final details in the next step.
To do this, draw the final leg on the back of the coyote. Because of the angle, you’ll notice that this leg has a more rounded base with the same thin, smooth bottom half as the other legs.
Once this leg is drawn, we can add the tail going down.
The tail is quite large and fluffy, so you can draw it with curved, jagged lines that connect to form the tail as it looks in our example. Then you are ready for the final details in the next step!
Step 5
You are now prepared to finish the final details and touch-ups in this fifth step of our guide on how to draw a coyote!
These details will be quite subtle, but they will help make this drawing even better than it already is.
To add this detail, you can draw some small, hard lines on the coyote’s fur to make those areas look thicker and more textured.
You can also add slightly curved lines to the tail to finish it. Then you can finish with some final details!
The coyote can be found in various environments, giving you many options for the type of environment you can choose for the animal.
Step 6
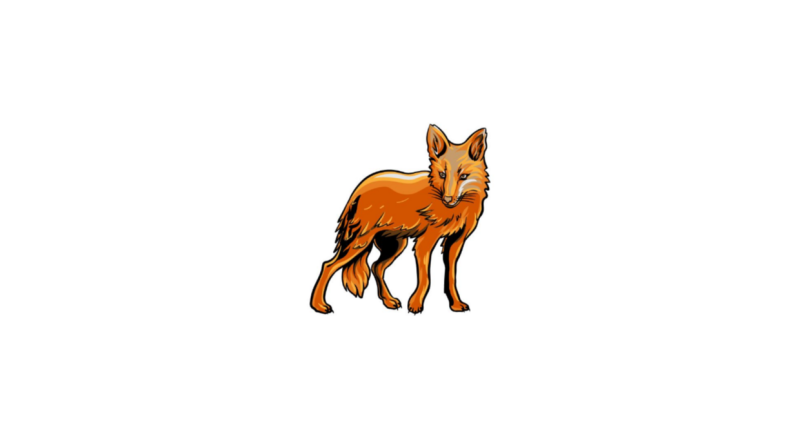
This is the final step of this coyote drawing, and it means it’s time for some coloring fun to finish off this awesome picture!
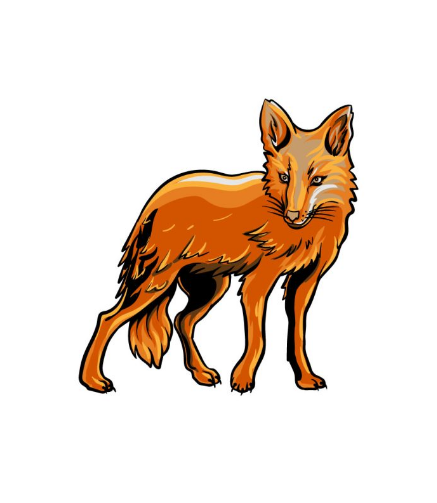
In our reference image, we showed you how to colorize this image.
We used some striking dark shades of orange, yellow, and red for this coyote’s fur, and you can use similar colors if you like the look of those colors.
There are other colors you could choose as well, and you should use whatever colors you love for that color!
Your Coyote Drawing is Finished!