
How to draw a Raccoon
How to draw a Raccoon. The raccoon is a medium-sized mammal born in North America. Raccoons are primarily classified as omnivores, but they can eat just about anything they can get their hands on! They are also primarily nocturnal, so they roam while other animals sleep. Although raccoons are native to nature, they have made their way to large urban cities and love city life. About fifty times more raccoons live in the city of Toronto than in the surrounding countryside and prairies. The peculiar appearance and cunning of raccoons made them very interesting to draw.
Therefore, we have created a step-by-step process for drawing a raccoon, summarized in 9 easy instructions and simple illustrations. Have fun drawing an adorable raccoon! You can draw many more characters like bow and arrow drawing, Anubis drawing, betta fish drawing, cobra drawing, blueberry drawing, fish drawing, coconut drawing and many more cool drawings easy.
Drawing a Raccoon
Step 1:
Start by drawing an oval shape on the top left side of your paper. It includes the body of the raccoon’s lead. Next, draw a tilted figure on both sides of the bottom of the head. It makes the particular furry cheeks of a raccoon! Drawing with a light grip and smooth strokes is essential when drawing an outline or a rough sketch. It guarantees that you can effortlessly erase parts of the system that you may not require later.
Step 2:
Obliterate the posterior part of the oval form that overlays the formation. It purifies the shape of the raccoon’s authority. After completing this step, the outline of the raccoon’s head should now be polished. Therefore, it should look more refined and noticeable.
Step 3:
Draw a curved line in the lower middle part of the raccoon’s head. Then remove a slight lateral elliptical shape at the base of the turn. It includes the muzzle and snout of the raccoon. Make sure the muzzle is pointing slightly towards the tip; this is one of the numerous specific parts of the raccoon! Make sure to remove the parts of the system that overlaps the muzzle!
Step 4:
Remove two inverted V-shaped stripes on both flanks at the top of the raccoon’s leader. It forms the raccoon’s pair of ears. Like the steps above, remove any overlapping lines in any part of the raccoon’s body. It keeps your drawing clean, tidy, and, most importantly, polished.
Step 5:
After creating the raccoon’s head, it’s time to structure its body. Continue drawing a round shape just below the raccoon’s head. Be sure to draw spiky strands of hair on the body’s surface to add texture, giving it a hairy, realistic look!
Step 6:
Draw a long, pointed silhouette connected to the lower part of the raccoon’s back. It forms the tail of the raccoon. Raccoons tend to have thick, fluffy tails, so keep that in mind when drawing the underside!
Step 7:
Draw a long, curved figure with claws on the right side of the raccoon’s chest to form its right front paw. Then draw the visible feet of the left front leg on the opposite side. Then draw a more prominent curved figure with one foot to structure the right hind leg. The raccoon’s back should be slightly thicker than the front legs. Since the raccoon is facing the left, its left leg is not visible, as shown in the illustration above.
Step 8:
Raccoons have different patterns on their tails, so that’s exactly what we’ll be working on in this step. Continue drawing several parallel lines down the length of the tail. When drawn correctly, it should create a “stripe” pattern on the raccoon’s tail. Now draw a triangle shape inside each raccoon’s ear. It creates the appearance of inner or inner ears.
Step 9:

Draw two small circles with a minor process at the top of the raccoon’s face. It forms the raccoon’s pair of eyes. Next, shade in all eyes, leaving out the smaller inner circles without shading to create a dramatic “bright eye” effect. After drawing the facial features of the raccoon, we will move on to the different patterns on its face. Continue drawing two curved lines that connect in the middle of the raccoon’s forehead.
Then draw two curved shapes around each eye. It is usually the amount of the raccoon with a dimmer fur coloring. There you go: you have successfully drawn a raccoon! Now it’s finally time for the part we’ve all been waiting for: coloring the rato.
Take these steps to bring your raccoon drawing to the next level.
Make your raccoon sketch even better with these 4 fun tricks! This picture of a raccoon we made is illustrated in a fun cartoon type. We love how it looks, but you should make a more realistic and detailed raccoon. If this dings like something you enjoy trying, you can search for raccoon pictures online. Try to find images that have the raccoon posed similarly to ours. Then match the steps in this guide with the photo that walks you through, and you’ll have a more detailed raccoon illustration! Whether you make the raccoon more realistic or keep it as is, you can add another raccoon friend to hang out with!
If you want to keep the raccoon style we created, follow the steps again. You can change specific details, like face or pose, to make the new raccoon unique. How numerous raccoons would you like to count on this idea? You can even count other creatures you like in your raccoon picture. They can also be small mammals and rodents such as squirrels or badgers. Or you could add something more expansive, like a wolf or a horse. These are just a few examples; You can add any other animal you like.
This way, your artwork would be even more dynamic than it already is! What different animals would you want to count? Finally, you can add a background to finish your raccoon sketch nicely. Raccoons can be seen in many other conditions, from woods to backyards and everything in between. You can also count other objects and elements fit for a raccoon. For instance, raccoons are well understood for rummaging via waste. You could draw a trash can that this raccoon is about to test, to get an idea. What kind of scenarios can you think of for this raccoon?
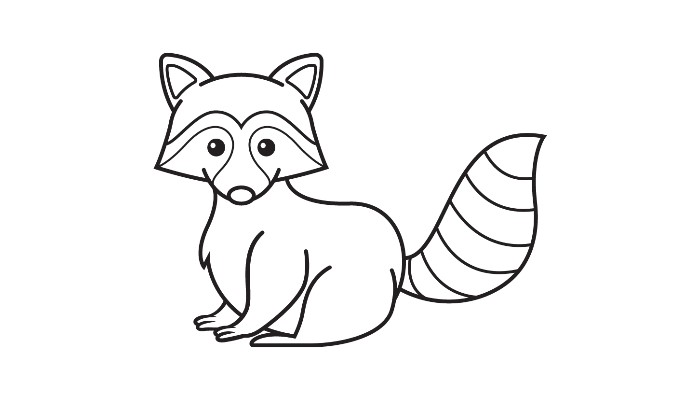
Your raccoon drawing is complete!
We hope you had a great time drawing a raccoon with this step-by-step drawing tutorial! Now that you can pull off a raccoon, why not try removing a raccoon hanging from a tree branch next time? Inspect our tree picture tutorial from our archives if you’re curious! Drawing a raccoon is an achievement, so you should be proud of yourself for completing a masterpiece!
Also Read: Eiffel Tower Drawing