
How to Install a Roof Vent: A Comprehensive Guide by QualityRoofer.com Vaughan | Roofing
Roof vents are an essential component of any home’s roofing system, yet they are often overlooked. They play a crucial role in maintaining a healthy and energy-efficient home by allowing proper ventilation and preventing moisture buildup. In this article, we’ll provide a comprehensive guide on how to install a roof vent. Whether you’re a DIY enthusiast or a professional roofer, you’ll find this guide helpful in ensuring proper installation and maintenance of your roof vent. If you’re located in Vaughan, Ontario, and are in need of professional roofing services, contact QualityRoofer.com Vaughan | Roofing. Our address is 290 Caldari Rd, Concord, ON L4K 4J4.
Types of Roof Vents
There are several types of roof vents available, and each has its advantages and disadvantages.
Ridge Vents
These vents are installed at the ridge of the roof, allowing warm air to escape from the attic. They are effective in providing uniform ventilation and are aesthetically pleasing since they blend well with the roofline. However, they can be difficult to install and may not work well in areas with heavy snowfall.
Soffit Vents
These vents are installed in the eaves of the roof and allow cool air to enter the attic while pushing out warm air. They are easy to install, cost-effective, and work well with other types of vents. However, they may be prone to blockages from debris and insulation.
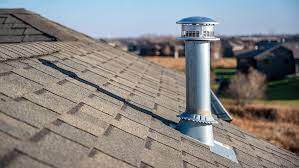
Turbine Vents
These vents use wind power to draw air out of the attic and are effective in areas with steady wind. They are affordable, energy-efficient, and easy to install. However, they can be noisy and may not work well in areas with inconsistent wind patterns.
Gable Vents
These vents are installed on the gable ends of the roof and are effective in providing cross-ventilation in the attic. They are easy to install and aesthetically pleasing. However, they may not work well in areas with high winds and can be prone to blockages from insulation.
Choosing the right type of roof vent depends on various factors such as climate, roof design, and personal preference. It’s best to consult a professional roofer to determine the most suitable option for your home.
Materials Needed For Installation
Before installing a roof vent, you’ll need to gather the necessary tools and materials. The tools and materials required for installation include:
Tools:
- Tape measure
- Chalk line
- Circular saw or reciprocating saw
- Pry bar
- Roofing hammer or nail gun
- Caulk gun
- Roofing cement trowel
- Safety harness and rope
- Drill and bits
- Screwdriver
Materials:
- Roof vent (chosen according to the roof design and personal preference)
- Roofing nails or screws
- Roofing cement
- Roofing tar paper or flashing
- Caulk
- Drip edge
- Insulation baffles (if needed)
- Roofing shingles or tiles (if needed)
It’s important to ensure that all materials are of high quality to ensure the longevity of the roof vent. Additionally, wearing appropriate safety gear such as gloves, boots, and safety glasses is crucial during installation. If you’re located in Vaughan, Ontario, and are in need of high-quality roofing materials or professional installation services, contact QualityRoofer.com Vaughan | Roofing at +1 647-243-9919. We use only the best materials and follow strict safety protocols to ensure the highest quality of service.
Preparing The Roof For Installation
Before starting the installation, it’s essential to take necessary safety precautions to prevent any accidents. Make sure to wear safety gear, including a safety harness and rope, to prevent falls. Here are the steps to prepare the roof for installation:
Choose The Location
Select the location for the roof vent by considering the roof design and the location of the attic. It’s best to place the vent near the ridge or gable end of the roof.
Mark The Location
Use a chalk line to mark the location of the vent on the roof. Double-check to ensure that the location is accurate.
Cut The Opening
Use a circular saw or reciprocating saw to cut the opening for the vent. Be sure to follow the manufacturer’s instructions for the size of the opening.
Install The Insulation Baffle
If needed, install an insulation baffle to prevent insulation from blocking the vent. The baffle should be installed from the inside of the attic.
Install The Roof Flashing
Install the roof flashing or tar paper around the opening to prevent water infiltration.
Install The Drip Edge
Install the drip edge around the opening to prevent water from seeping under the shingles.
By following these steps, you’ll ensure that the roof is adequately prepared for the installation of the roof vent.
Installing The Roof Vent
Here is a step-by-step guide to installing a roof vent:
Install The Vent Base
Place the vent base over the opening and secure it using roofing nails or screws. Be sure to follow the manufacturer’s instructions for the number and placement of the fasteners.
Install The Vent Pipe
Connect the vent pipe to the vent base and secure it using screws or roofing nails. Make sure that the pipe is properly aligned with the roof.
Apply Roofing Cement
Apply roofing cement around the base of the vent and pipe to seal any gaps. Use a roofing cement trowel to spread the cement evenly.
Install The Vent Cover
Attach the vent cover to the vent pipe using screws or roofing nails. Make sure that the cover is properly aligned with the pipe and base.
Apply Caulk
Apply caulk around the edges of the vent cover to seal any gaps. Use a caulk gun to apply an even bead of caulk.
Inspect The Installation
Check the installation to ensure that the vent is properly aligned and secured. Make sure that there are no gaps or leaks around the vent.
By following these steps, you’ll ensure that the roof vent is properly installed and sealed. It’s important to follow the manufacturer’s instructions and to use high-quality materials to ensure the longevity of the vent. If you’re located in Vaughan, Ontario, and are in need of high-quality roofing materials or professional installation services, contact QualityRoofer.com Vaughan | Roofing at +1 647-243-9919 or visit our website at https://qualityroofer.com/service-areas/vaughan-on/. We offer a wide range of roofing services and materials to meet your needs.
Conclusion
In conclusion, roof vents are critical components of any home’s roofing system. Proper ventilation is essential in maintaining a healthy and energy-efficient home while preventing moisture buildup. In this article, we provided a comprehensive guide on how to install a roof vent, including the different types of vents, the materials required, and the steps to prepare the roof and install the vent. By following these steps and taking necessary safety precautions, you can ensure that your roof vent is properly installed and maintained. Remember to consult a professional if you are unsure about any aspect of the installation process. Don’t overlook the importance of roof vents in maintaining a healthy and energy-efficient home.