
Netgear AX6000 Extender Setup
Discover about one of the most difficult extenders that makes use of cutting-edge technology. After completing Netgear AX6000 setup, you will be able to quickly extend your network to even the most isolated areas of your house, converting your dead zones into delightful areas.
Maximum capacity, speed, and coverage were considered in the design of the Nighthawk AX6000 AX8 8-Stream Mesh extender. With rates of up to 6gbps, you’ll receive faster Wi-Fi and a better internet connection.
WPS Method for Netgear AX6000 Setup:-
The quickest and simplest approach to set up your Netgear AX6000 Setup is using a wireless protected setup, so let’s talk about that today (WPS).
You can configure a Netgear AX6000 Setup without providing a password, username, or SSID by using the WPS method. One tiny button must be pressed to change this setting.
Notice these guidelines to setup your Netgear AX6000:
- Turn on your Nighthawk EAX80 AX600.
- Position your AX6000 next to the home extender.
- Once the power LED turns a constant green, keep an eye on it.
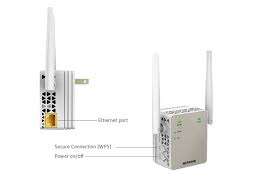
- On the side of the EAX80, locate the WPS button.
- Press the WPS button on the extender.
- After two minutes, press the WPS button on the extender as well.
- Allow the LEDs to stabilize in a green color for two minutes.
- Now you can change the location of your signal booster.
- Connect the additional hardware to the network.
- It only takes two minutes to set up your Nighthawk AX6000 this way.
- In the blog that follows, we will go over the firmware updating process.
By doing this, set up your Nighthawk AX6000 in just two minutes.
Manual Method for Netgear AX6000 Setup
Manually setup the Netgear AX6000:-
- By plugging it in, turn on your EAX80.
- Obtain any wifi-enabled mobile device.
- You need a network connection on your device.
- Keep an eye out for a steady green LED light.
- Use a web browser to go to www.mywifiext.net or Netgear IP.
- It will then display the Netgear Installation Assistant.
- To complete the configuration process, adhere to the directions.
- When it’s done, the extender’s LEDs will remain a constant green color.
- Unplug the AX6000 and then place it somewhere else with a poor network.
- To begin enjoying the services, join the expanded network right away.
This is how your Netgear AX6000 can be configured.
The Netgear AC1200 AX6000 WiFi Extender Setup Instruction
- The laptop interface has a number of excellent features. Additionally, Netgear AX6000 Setup’s routine firmware updates give you a bug-free experience.
- With its 802.11ac dual-band WiFi, 5dBi high-gain external antennas, and 700mW high-power architecture, your home or place of business will have more focused coverage and the fastest possible speeds.
- WiFi performance is considerably enhanced by a quad-core CPU.
- Thanks to MU-MIMO WiFi technology, you may simultaneously play videos and games on many platforms.
- FastLane Technology lets you use both bands with higher coverage and speed so you can play games and view HD videos without being disturbed.
enables you to experience safe wireless links by making sure that WiFi signals are directly received by the connected devices.
With its 5 Gigabit Ethernet connections, the extender can simultaneously support 5 computers.
Despite its intricacy, the Netgear WiFi Extender EX6200’s setting is still relatively simple.
New firmware for the Netgear AX6000 Extender:-
Do you experience performance issues with your AX6000? Has it started to behave oddly now? Because the new security updates serve to fix flaws and improve the extender’s operation, you must upgrade the Netgear Nighthawk EAX80 Firmware to fix these issues.
To upgrade the firmware on a Netgear Nighthawk EAX80, adhere to the steps listed below:-
- power on your Netgear Nighthawk EAX80.
- Take your smartphone.
- Visit www.mywifiext.net if you please.
- The Netgear login page will appear on the screen.
- Please provide your specific information.
- After choosing Settings, click Firmware Update.
- While your AX6000 is updating, avoid unplugging it.
- The update for your firmware was successful.
This simple process will fix the performance issues on your extender by updating the firmware.
Netgear AX6000 Setup using the Nighthawk app:-
The Nighthawk app may be used to configure a Netgear WiFi extender as well. For new extender setup and login, the app can be used without a PC or laptop.
For Android smartphones, the Netgear Nighthawk application is accessible.
Use the Nighthawk app to configure a Netgear Nighthawk AX600 EAX80 extender by following these steps:
- any mobile platform, join.
- On it, install the Nighthawk programme.
- Navigate using the wifi option.
- It is needed to connect to Netgear ext.
- Consider using the Nighthawk app.
- To complete the configuration process, adhere to the on-screen directions.
This is how you may install your Nighthawk AX6000 EAX80 using the Nighthawk app.
The Netgear Nighthawk AX6000 EAX80 reset method:-
When the admin account and password need to be recovered, a factory reset procedure is typically necessary. Your extender will immediately be prepared for the new installation process when you use the Netgear AX6000 EAX80 Factory Reset. For this process, paper clips or strong needles are necessary.
The Nighthawk AX6000 EAX80 reset instructions are as follows:
- Launch the AX6000.
- Grab a pen or a strong pin.
- The reset button on the EAX80 is accessible through a small hole.
- The hard pin should be inserted and held in place for 9–10 seconds.
- After 9 to 10 seconds, gently remove the pin.
- The factory reset process was successfully carried out.
If you still have issues about the setup, update, or reset process, call our experts, engage in live chat, or use one of our toll-free phones.

